Watch Faces
Use the Android Mode to develop interactive watch faces.
Smartwatches
Android Wear allows you to create custom smartwatch faces that can represent time in original ways by taking advantage of the display and interaction capabilities of these devices. You can also obtain body sensors data (steps, hearth rate) to visualize the physical activity of the user. Developing watch faces require some special consideration though, due to the limitations of these devices in terms of screen size and battery life. Google has published some guidelines for watch face design.
Getting ready
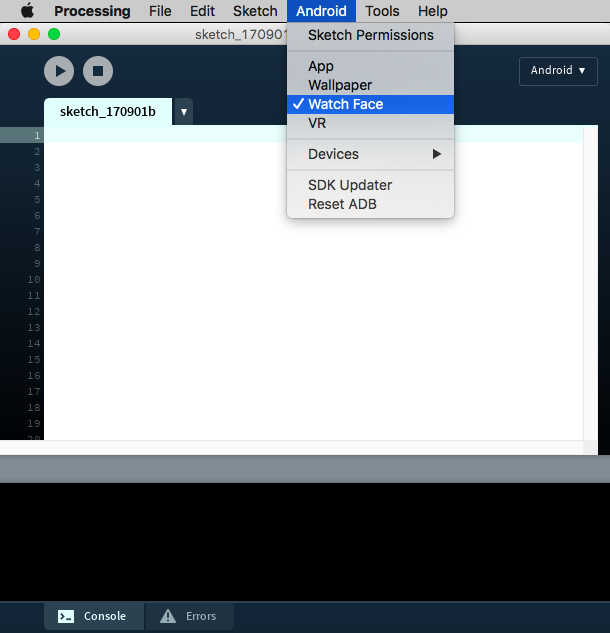
First of all, developing for a smartwatch requires to pair the watch with a phone that will function as a bridge between the computer you are runnig Processing on, and the watch itself. To do so, you have to setup the devices for debugging over Bluetooth, which is explained here. Once you have done it, you can select the Watch Face option in the Android menu:
A very simple watch face
As a very simple first attempt at creating a watch face, let's just display the time using text. The structure of the sketch is very straightfoward:
void setup() {
  fullScreen();
  frameRate(1);
  textFont(createFont("SansSerif", 30 * displayDensity));
  fill(255);
}

void draw() {
  background(0);
  translate(0, +wearInsets().bottom/2);
  if (!wearAmbient()) {
    String str = hour() + ":" + minute() + ":" + second();
    float w = textWidth(str);
    text(str, (width - w)/2, height/2 + 24);
  }
}
A couple of things to observe in this code is the use of a frame rate of 1 because the text only changes once every second, so it there is no need to update the screen any faster (which consumes more battery). Also, the watch face is drawn only if the built-in function wearAmbient() returns false. The reason for this is that, in the contrary, it returns true, then it means that the person wearing the watch is not looking at it, so it switches to ambient (or always-on) mode in order to save battery. In ambient mode, the display is updated only once every minute, and it is recommended to keep most of the screen black and render only a simplified version of the watch face.
Also, we use the wearInsets() function to get the insets of the screen. In particular, the bottom inset helps to properly center the sketch's output in watches that have a "chin" in the bottom of the screen, like the Moto 360, so the entire frame is shifted downwards by half of that value in order to be properly centered. Another important built-in variable that we are not using in this case is isRound, which tells you whether the shape of the watch is round or square. For a complete list of all the built-in variables available for watch faces, please take a look at the reference page.
Representing time
You can use the time values to generate patterns and shapes that change as hours, minutes, and seconds go by. In the following code, we paint the screen black from left to right as time progresses from midnight to midnight. We can also tap the screen to add dots to the uncovered area, and making them dissapear once they are reached at a specific time during the day:
ArrayList<PVector> dots;
int totalMin = 24 * 60;

void setup() {
  fullScreen();
  frameRate(1);
  dots = new ArrayList<PVector>();
}

void draw() {
  int time = hour() * 60 + minute();
  if (time == 0) dots.clear();
  float x = map(time, 0, totalMin, 0, width);
  if (wearAmbient()) {
    background(0);
    noFill();
    stroke(255);
    line(x, 0, x, height);
    for (PVector d: dots) {
      ellipse(d.x, d.y, 10, 10);
    }
  } else {
    background(255);
    fill(0);
    noStroke();
    rect(0, 0, x, height);
    for (PVector d: dots) {
      ellipse(d.x, d.y, 10, 10);
    }
  }

  for (int i = dots.size()-1; i >= 0; i--) {
    PVector d = dots.get(i);
    if (d.x < x) {
      dots.remove(i);
    }
  }
}

void mousePressed() {
  dots.add(new PVector(mouseX, mouseY));
}
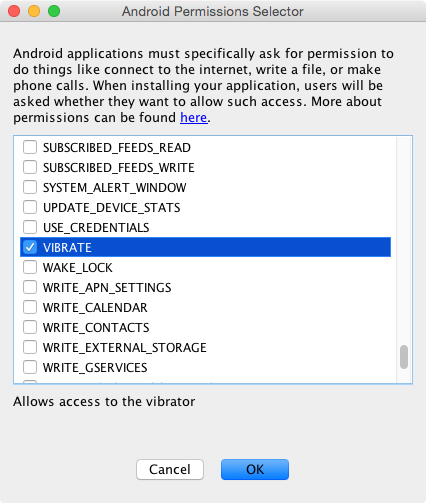
Let's make the watch vibrate when a dot is reached by the black color. In order to access the vibrator in the watch, we need to enable the appropriate permission. We do this by opening the "Sketch Permissions" option under the Android menu and selecting the appropriate permission:
After importing the Vibrator and Context classes, we initialize the vibrator instance in setup():
import android.os.Vibrator;
import android.content.Context;

ArrayList<PVector> dots;
int totalMin = 24 * 60;
Vibrator vibrator;

void setup() {
  fullScreen();
  frameRate(1);
  dots = new ArrayList<PVector>();
  Context context = getContext();
  vibrator = (Vibrator) context.getSystemService(Context.VIBRATOR_SERVICE);
}
The vibrador() method allows us to set a vibration for a period of time expressed in milliseconds, so for half second vibration:
  for (int i = dots.size()-1; i >= 0; i--) {
    PVector d = dots.get(i);
    if (d.x < x) {
      dots.remove(i);
      vibrator.vibrate(500);
    }
  }
Counting steps
Most Android devices, including smartwatches, feature a step counter sensor that we access in the same way as other sensors we used earlier. The skeleton for the sketch would be:
import android.content.Context;
import android.hardware.Sensor;
import android.hardware.SensorManager;
import android.hardware.SensorEvent;
import android.hardware.SensorEventListener;

SensorManager manager;
Sensor sensor;
SensorListener listener;

void setup() {
  fullScreen();
  frameRate(1);

  Context context = getContext();
  manager = (SensorManager)context.getSystemService(Context.SENSOR_SERVICE);
  sensor = manager.getDefaultSensor(Sensor.TYPE_STEP_COUNTER);
  listener = new SensorListener();
  manager.registerListener(listener, sensor, SensorManager.SENSOR_DELAY_NORMAL);
}

void draw() {
}

public void resume() {
  if (manager != null) {
    manager.registerListener(listener, sensor, SensorManager.SENSOR_DELAY_NORMAL);
  }
}

public void pause() {
  if (manager != null) {
    manager.unregisterListener(listener);
  }
}

class SensorListener implements SensorEventListener {
  public void onSensorChanged(SensorEvent event) { }
  public void onAccuracyChanged(Sensor sensor, int accuracy) { }
}
In this code we define the manager, sensor, and listener in the same way as in previous examples. The sensor value holding the step count is event.values[0], which we can store in our own variable:
int offset = -1;
int steps;

...

class SensorListener implements SensorEventListener {
  public void onSensorChanged(SensorEvent event) {
    if (offset == -1) offset = (int)event.values[0];
    steps = (int)event.values[0] - offset;
  }
  public void onAccuracyChanged(Sensor sensor, int accuracy) { }
}
And finally, we can add some font initialization in setup(), and use the step count values in the draw function, for example here simply to print them as text:
void setup() {
  fullScreen();
  frameRate(1);

  textFont(createFont("SansSerif", 30 * displayDensity));
  textAlign(CENTER, CENTER);
  fill(255);

  Context context = getContext();
  manager = (SensorManager)context.getSystemService(Context.SENSOR_SERVICE);
  sensor = manager.getDefaultSensor(Sensor.TYPE_STEP_COUNTER);
  listener = new SensorListener();
  manager.registerListener(listener, sensor, SensorManager.SENSOR_DELAY_NORMAL);
}

void draw() {
  background(0);
  translate(0, +wearInsets().bottom/2);
  if (!wearAmbient()) {
    String str = steps + " steps";
    float w = textWidth(str);
    text(str, 0, 0, width, height);
  }
}
You might want to save the step count values in order to keep track of the activity profile of the user. You can use the different functions available in Processing to save and load data in your watch face, for example saveStrings() and loadStrings(). However, you need to make sure that the WRITE_EXTERNAL_STORAGE permission is enabled.