AR in Processing
How to create Augmented Reality apps using Processing for Android.
ARCore
Google offers a framework to create Augmented Reality (AR) apps for Android, called ARCore. Phone-based AR experiences typically involve drawing digital 3D content on top of the physical world, as seen from the perspective of the phone's camera, in such a way that the digital contents convincingly appear to be part of the real-world environment. Doing this requires applying complex algorithms in real-time to recognize objects in the physical environment, such as walls, pieces of furniture, even people, and determining the pose (position and orientation) of the phone relative to the world over time. Fortunately for us, ARCore handles all of these calculations automatically, and provides an API to access the real-world features and attach digital contents to them from our code. While it is possible to access ARCore directly from Processing, the Android mode includes an AR library that makes it easier to use ARCore in our Processing sketches and apply Processing's drawing API to create AR content.
AR is a rapidly growing field, thanks to frameworks such as ARCore on Android (and ARKit on iOS) and to the fast pace of technical improvement of smartphones. The integration of real-world environments with digital contents is opening many new possibilities for phone-mediated experiences in the physical world. The AR experiments from Google and the Awesome ARKit list of AR apps for iOS are good resources to find projects making creative use of AR.
Requirements
In order to ensure a good AR experience, Google certifies devices to be supported by ARCore. The official list of supported devices is available here. The devices in that list should work with Processing as well to create AR projects.
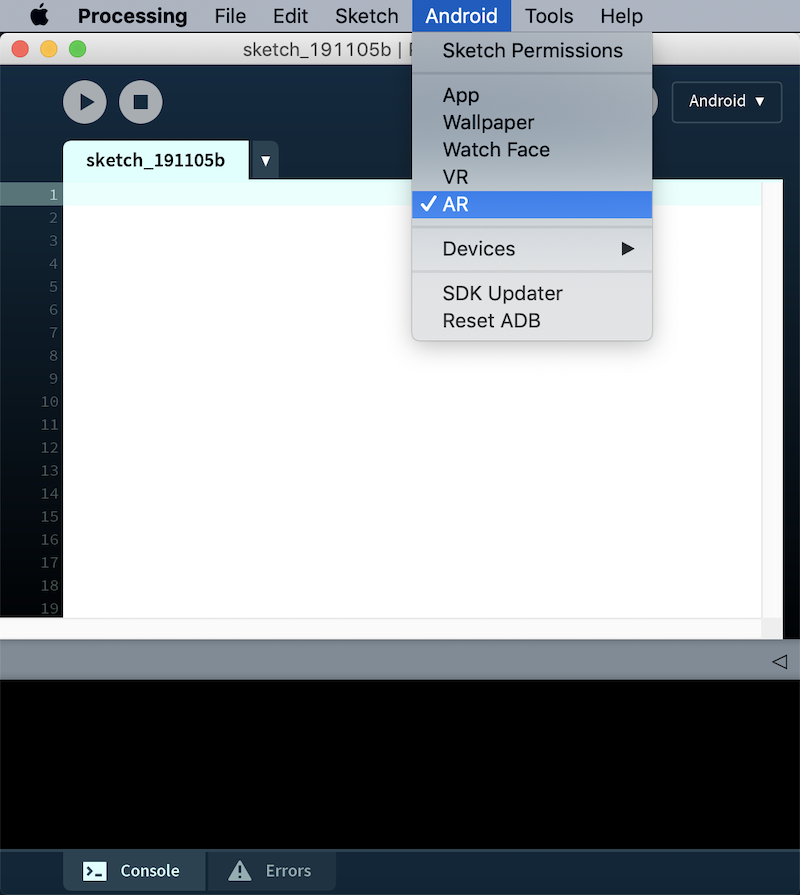
Getting started
You need to select the AR option in the Android menu to make sure that your sketch is built as an AR app:
While in VR you can make pretty much turn any 3D Processing sketch into VR simply by importing the VR library and using the VR renderer, using AR requires a few more steps. First of all, we need to add an ARTracker to our sketch, and call its start() function to get AR tracking going. The other two classes in the AR library are ARTrackble and ARAnchor, they represent a surface that can be tracked in real-world space (such as a table or a wall), and a point in space that remains fixed relative to a given trackable surface. These concepts will hopefully become clearer as we go through the tutorial. For the time being, a basic skeleton for an AR sketch in Processing could look like the following code, where we just launch tracking and print to the console the trackable objects detected in each frame:
import processing.ar.*;

ARTracker tracker;

void setup() {
  fullScreen(AR);
  tracker = new ARTracker(this);
  tracker.start();
  noStroke();
}

void draw() {
  lights();
  for (int i = 0; i < tracker.count(); i++) {
    ARTrackable t = tracker.get(i);
    println("Trackable", i, t);
  }
}
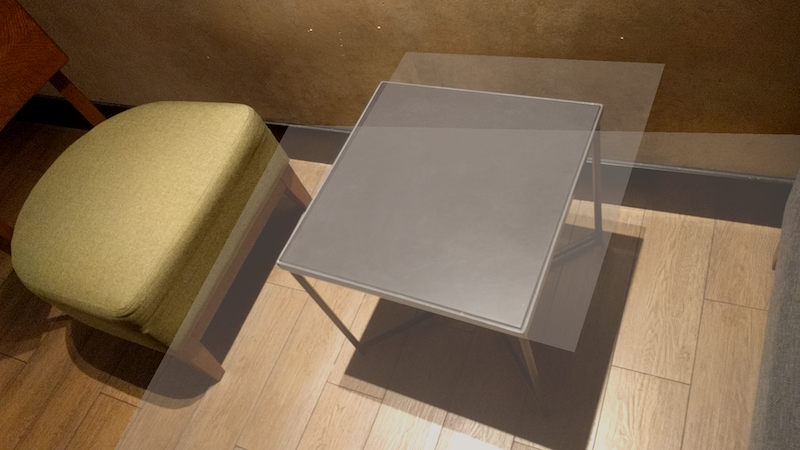
Drawing trackables
Trackable objects in Processing are limited to plane surfaces, even though the underlying trackable in ARCore can represent other kind of features in physical space, such as cloud points. Each trackable object contains basic information about the physical entity it represents, including size and current status (whether is being tracked, paused, or stopped). In order to draw a trackable plane, we first need to apply the transformation that turns Processing's world coordinates into the trackable system, in this way, it is easy to represent points relative to the trackable plane that spans X and Z axis irrespective of its orientation with respect to Processing's coordinate system. We can retrieve the size of the trackable along each axis with the lengthX() and lengthZ() functions, and call the transform() function before making any drawing:
import processing.ar.*;

ARTracker tracker;

void setup() {
  fullScreen(AR);
  tracker = new ARTracker(this);
  tracker.start();
  noStroke();
}

void draw() {
  lights();
  for (int i = 0; i < tracker.count(); i++) {
    ARTrackable t = tracker.get(i);
    pushMatrix();
    t.transform();
    float lx = t.lengthX();
    float lz = t.lengthZ();
    fill(255, 100);
    beginShape(QUADS);
    vertex(-lx/2, 0, -lz/2);
    vertex(-lx/2, 0, +lz/2);
    vertex(+lx/2, 0, +lz/2);
    vertex(+lx/2, 0, -lz/2);
    endShape();
    popMatrix();
  }
}
The sketch above should draw all the trackable planes being detected by the phone as we move around:
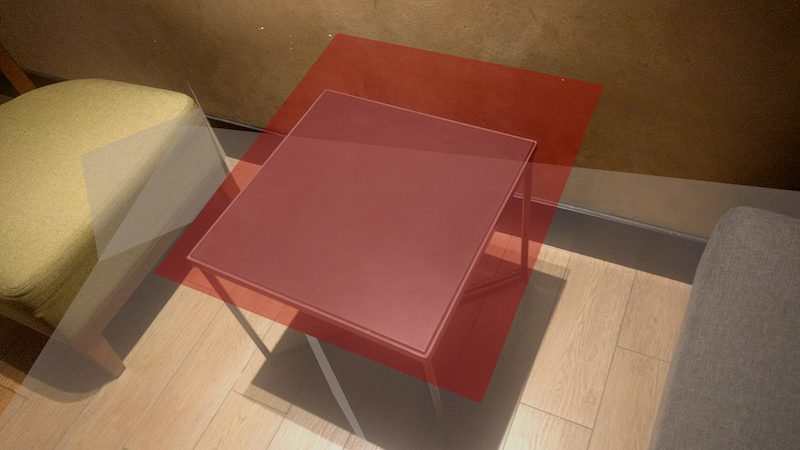
It is easy to test if a trackable is being selected by the user using the touchscreen, all we need to is to call the isSelected(x, y) with the (x, y) coordinates of the touch point:
    ...
    t.transform();
    float lx = t.lengthX();
    float lz = t.lengthZ();
    if (mousePressed && t.isSelected(mouseX, mouseY)) {
      fill(255, 0, 0, 100);
    } else {
      fill(255, 100);
    }
    beginShape(QUADS);
    vertex(-lx/2, 0, -lz/2);
    ...
Adding the code above to our previous sketch should result in the following interaction when touching a plane in the camera image:
Using anchors
Once we have trackable surfaces in our AR scene, we can attach anchors to them. Anchors in ARCore are essentially positions in space that are fixed relative to the trackable they are attached to, and allow us to make virtual objects appear to stay in place in the scene. Anchor objects in Processing are created with the relative coordinates they will have relative to their parent trackable. Extending our code above, we could add new anchors exactly when a trackable is detected for the first time. That event can be handled by adding the trackableEvent() function to our code, which will receive the trackable being detected as an argument. We need to keep track of all the anchors in our scene manually, for example by storing them in a list, and removing them when they are no longer being tracked. The following code does all of that:
import processing.ar.*;

ARTracker tracker;
ArrayList<ARAnchor> trackAnchors = new ArrayList<ARAnchor>();

void setup() {
  fullScreen(AR);
  tracker = new ARTracker(this);
  tracker.start();
  noStroke();
}

void draw() {
  lights();
  drawAnchors();
  drawTrackables();
}

void trackableEvent(ARTrackable t) {
  if (trackAnchors.size() < 10 && t.isFloorPlane()) {
    trackAnchors.add(new ARAnchor(t, 0, 0, 0));
  }
}

void drawAnchors() {
  for (ARAnchor anchor : trackAnchors) {
    if (anchor.isTracking()) drawSphere(anchor, 0.05);
    if (anchor.isStopped()) anchor.dispose();
  }
  tracker.clearAnchors(trackAnchors);
}

void drawTrackables() {
  for (int i = 0; i < tracker.count(); i++) {
    ARTrackable t = tracker.get(i);
    pushMatrix();
    t.transform();
    float lx = t.lengthX();
    float lz = t.lengthZ();
    if (mousePressed && t.isSelected(mouseX, mouseY)) {
      fill(255, 0, 0, 100);
    } else {
      fill(255, 100);
    }
    drawPlane(lx, lz);
    popMatrix();
  }
}

void drawSphere(ARAnchor anchor, float r) {
  anchor.attach();
  fill(#CF79F5);
  sphere(r);
  anchor.detach();
}

void drawPlane(float lx, float lz) {
  beginShape(QUADS);
  vertex(-lx/2, 0, -lz/2);
  vertex(-lx/2, 0, +lz/2);
  vertex(+lx/2, 0, +lz/2);
  vertex(+lx/2, 0, -lz/2);
  endShape();
}
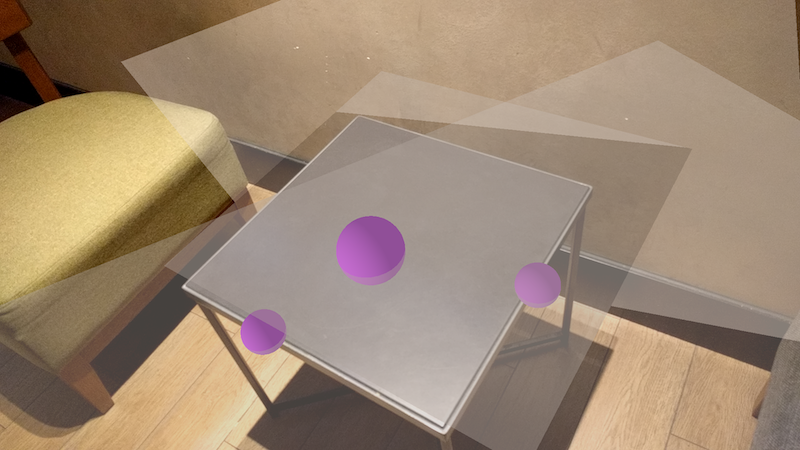
In the code above, we create a new anchor at the point (0, 0, 0) relative to the trackable being detected, but only if is a horizontal surface (i.e.: a floor), which we can detect by calling isFloorPlane(). A similar function, isWallPlane(), allows us to know if the trackable is a vertical plane (i.e.: a wall). It is important to notice the dimensions of the objects in AR are rather small in comparison with a typical 3D sketch (for example, the radius of the spheres being drawn at the anchor positions is only 0.05).
It is also important that we dispose an anchor once is no longer tracked with the line if (anchor.isStopped()) anchor.dispose(); to make sure we don't waste resources with anchors that are no longer active (anchors that are simply paused should not be disposed as they can be tracked again later, but those stopped are not going to be restarted). We should also remove the disposed anchors from our array list, we can do that in our sketch, or use the utility function clearAnchors provided in the ARTracker class. The result of our latest code should be the following:
Hitting trackables
A typical interaction in AR is to move around an object along a trackable plane, for example to find its best placement interactively. The AR library in Processing offers functionality that makes implementing such interaction very easy. The ARTracker class has a get() function that takes an (x, y) touch position, and returns the trackable hit by that touch point. We can then create a new anchor for that hit trackable, and the anchor will be placed exactly at the position on the trackable that's at the intersection with the touch pointer. As the pointer moves around, we need to keep disposing the anchor at the previous position and creating another one at the new position. This is done with the following code (to be added to last version of our sketch):
import processing.ar.*;

ARTracker tracker;
ArrayList<ARAnchor> trackAnchors = new ArrayList<ARAnchor>();
ARAnchor touchAnchor;
PShape obj;

void setup() {
  fullScreen(AR);
  obj = loadShape("model.obj");
  tracker = new ARTracker(this);
  tracker.start();
  noStroke();
}

void draw() {
  lights();
  drawObject(touchAnchor);
  drawAnchors();
  drawTrackables();
}

void mousePressed() {
  if (touchAnchor != null) touchAnchor.dispose();
  ARTrackable hit = tracker.get(mouseX, mouseY);
  if (hit != null) touchAnchor = new ARAnchor(hit);
  else touchAnchor = null;
}
...
void drawObject(ARAnchor anchor) {
  if (anchor != null) {
    anchor.attach();
    shape(obj);
    anchor.detach();
  }
}
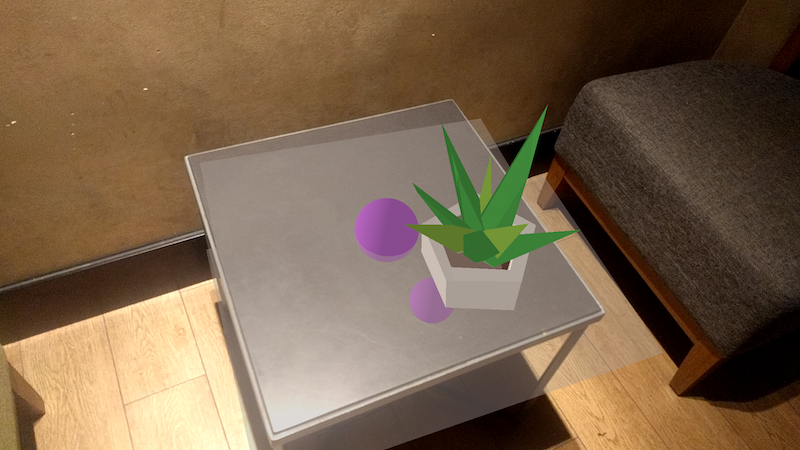
Here we are using an OBJ model loaded from the sketch's data folder to draw at the placement of the hit anchor. If all is correct in the code, the output would look similar to the following:
The complete sketch code is available here.