Using the sensors
This tutorial gives you the basics of reading sensor data from Processing.
Sensor API in the Android SDK
Smartphones and tablets include many different types of sensors, for example accelerometers, gyroscopes, magnetometers, and thermometers. These sensors allow us to obtain information about the movement, environment, and position of the device.
While the Processing language does not have specialized functions to read data from these sensors, you can import the packages in the Android SDK that receive sensor measurements into your sketch.
Creating a sensor manager
In the first example, we will create a sketch that responds to changes in acceleration, so we will be using the data from the accelerometer. The first step to use the sensor API is to obtain the context of the activity that contains the sketch, and get a sensor manager from this context. Then, we can initialize the sensor we need in our sketch, in this case an accelerometer. We do all of this in the setup() function:
import android.content.Context;
import android.hardware.Sensor;
import android.hardware.SensorManager;

Context context;
SensorManager manager;
Sensor sensor;

void setup() {
  fullScreen();

  context = getActivity();
  manager = (SensorManager)context.getSystemService(Context.SENSOR_SERVICE);
  sensor = manager.getDefaultSensor(Sensor.TYPE_ACCELEROMETER);
}

void draw() {
}
Adding a sensor listener
Now we need to add a "listener" class that will notify the sketch that new data is available from the sensor. A listener for each sensor is derived from the base SensorEventListener class in the Android SDK. Once we have a listener instance in the sketch, we can register the listener with the manager:
import android.content.Context;
import android.hardware.Sensor;
import android.hardware.SensorManager;
import android.hardware.SensorEvent;
import android.hardware.SensorEventListener;

Context context;
SensorManager manager;
Sensor sensor;
AccelerometerListener listener;

void setup() {
  fullScreen();

  context = getActivity();
  manager = (SensorManager)context.getSystemService(Context.SENSOR_SERVICE);
  sensor = manager.getDefaultSensor(Sensor.TYPE_ACCELEROMETER);
  listener = new AccelerometerListener();
  manager.registerListener(listener, sensor, SensorManager.SENSOR_DELAY_GAME);
}

void draw() {
}

class AccelerometerListener implements SensorEventListener {
  public void onSensorChanged(SensorEvent event) {
  }
  public void onAccuracyChanged(Sensor sensor, int accuracy) {
  }
}
You probaby noticed the SensorManager.SENSOR_DELAY_GAME argument in the listener registration. This argument sets the rate at which the sensor is updated with new data. Faster rates mean more responsiveness, but also more battery consumption. There are several pre-defined rate constants in addition to SENSOR_DELAY_GAME, you can also use SENSOR_DELAY_FASTEST, SENSOR_DELAY_NORMAL, and SENSOR_DELAY_UI.
Reading the sensor data
The event listener has two methods, onSensorChanged() and onAccuracyChanged(). We only need to use onSensorChanged() to get the data from the sensor. In the case of the accelerometer, the data consists of three float numbers, representing the acceleration along the X, Y, and Z axis of the device, defined as follows:
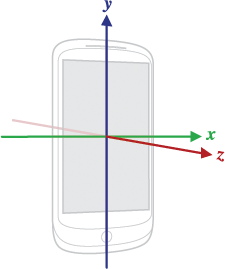
As a first test, we can simply print these values to the screen, and verify that if we place the phone flat on the table with the screen facing up, then we see a Z acceleration of 9.81 m/s2, corresponding to the force of gravity.
import android.content.Context;
import android.hardware.Sensor;
import android.hardware.SensorManager;
import android.hardware.SensorEvent;
import android.hardware.SensorEventListener;

Context context;
SensorManager manager;
Sensor sensor;
AccelerometerListener listener;
float ax, ay, az;

void setup() {
  fullScreen();

  context = getActivity();
  manager = (SensorManager)context.getSystemService(Context.SENSOR_SERVICE);
  sensor = manager.getDefaultSensor(Sensor.TYPE_ACCELEROMETER);
  listener = new AccelerometerListener();
  manager.registerListener(listener, sensor, SensorManager.SENSOR_DELAY_GAME);

  textFont(createFont("SansSerif", 30 * displayDensity));
}

void draw() {
  background(0);
  text("X: " + ax + "\nY: " + ay + "\nZ: " + az, 0, 0, width, height);
}

class AccelerometerListener implements SensorEventListener {
  public void onSensorChanged(SensorEvent event) {
    ax = event.values[0];
    ay = event.values[1];
    az = event.values[2];
  }
  public void onAccuracyChanged(Sensor sensor, int accuracy) {
  }
}
As a best practice for using sensors, it is recommended to unregister the listener when the sketch's activity is paused to reduce battery usage, and then registering it again when the activity resumes. We can achieve this adding the following code to our sketch:
public void onResume() {
  super.onResume();
  if (manager != null) {
    manager.registerListener(listener, sensor, SensorManager.SENSOR_DELAY_GAME);
  }
}

public void onPause() {
  super.onPause();
  if (manager != null) {
    manager.unregisterListener(listener);
  }
}
We need to check for a null manager instance because onPause() or onResume() could be called before the setup() function in our sketch.
A more complex example using Box2D
One possible use of the sensor data is to control the movement of graphical elements in our sketch. The values from the accelerometer directy represent the force the device is subject to, so if we use those to control the behaviour of, say, a rigid body system, then we could pair behaviours in the code with movements in real space.
In order to achieve this goal, we will make use of the Box2D for Processing library by Daniel Shiffman. Although this library was not created for Android, it can still be used from sketches in the Android mode since it is written in Java!
We will combine the basic code from the previous example to read accelerometer data with a simple Box2D simulation where the borders of the screen define the boundaries of the simulation, and a number of boxes bounce around under the acceleration measured by the device. The full code of the example is available here.
Without the accelerometer data, we can write the Box2D code as follows (the implementation of the Box and Wall classes is not included, check the full example code on GitHub):
import shiffman.box2d.*;
import org.jbox2d.collision.shapes.*;
import org.jbox2d.common.*;
import org.jbox2d.dynamics.*;

Box2DProcessing box2d;
ArrayList<Box> boxes;
ArrayList<Wall> walls;

void setup() {
  fullScreen(P2D);
  orientation(PORTRAIT);

  box2d = new Box2DProcessing(this);
  box2d.createWorld();
  box2d.setGravity(0, -10);

  // A group of boxes
  boxes = new ArrayList<Box>();
  for (int i = 0; i < 20; i++) {
    Box p = new Box(random(200, width-200), random(200, height-200));
    boxes.add(p);
  }

  // Invisible walls
  walls = new ArrayList<Wall>();
  walls.add(new Wall(width/2, -25, width, 50));
  walls.add(new Wall(width/2, height+25, width, 50));
  walls.add(new Wall(-25, height/2, 50, height));
  walls.add(new Wall(width+25, height/2, 50, height));
}

void draw() {
  background(255);

  box2d.step();

  for (Box b: boxes) {
    b.display();
  }
}

void mousePressed() {
  for (Box b: boxes) {
    b.shake();
  }
}
In this code we used the constant acceleration along Y of (0, -10), but now we can link the gravitational force in Box2D to the acceleration values from the sensor by doing:
box2d.setGravity(-ax, -ay);
So the final code for the sketch combining Box2D with the accelermeter data would be:
import android.content.Context;
import android.hardware.Sensor;
import android.hardware.SensorManager;
import android.hardware.SensorEvent;
import android.hardware.SensorEventListener;

import shiffman.box2d.*;
import org.jbox2d.collision.shapes.*;
import org.jbox2d.common.*;
import org.jbox2d.dynamics.*;

Context context;
SensorManager manager;
Sensor sensor;
AccelerometerListener listener;
float ax, ay, az;

Box2DProcessing box2d;
ArrayList<Box> boxes;
ArrayList<Wall> walls;

void setup() {
  fullScreen(P2D);
  orientation(PORTRAIT);

  context = getActivity();
  manager = (SensorManager)context.getSystemService(Context.SENSOR_SERVICE);
  sensor = manager.getDefaultSensor(Sensor.TYPE_ACCELEROMETER);
  listener = new AccelerometerListener();
  manager.registerListener(listener, sensor, SensorManager.SENSOR_DELAY_NORMAL);

  box2d = new Box2DProcessing(this);
  box2d.createWorld();

  // A group of boxes
  boxes = new ArrayList<Box>();
  for (int i = 0; i < 20; i++) {
    Box p = new Box(random(200, width-200), random(200, height-200));
    boxes.add(p);
  }

  // Invisible walls
  walls = new ArrayList<Wall>();
  walls.add(new Wall(width/2, -25, width, 50));
  walls.add(new Wall(width/2, height+25, width, 50));
  walls.add(new Wall(-25, height/2, 50, height));
  walls.add(new Wall(width+25, height/2, 50, height));
}

void draw() {
  background(255);

  // update gravity from accelerometer data.
  box2d.setGravity(-ax, -ay);

  box2d.step();

  for (Box b: boxes) {
    b.display();
  }
}

void mousePressed() {
  for (Box b: boxes) {
    b.shake();
  }
}

public void onResume() {
  super.onResume();
  if (manager != null) {
    manager.registerListener(listener, sensor, SensorManager.SENSOR_DELAY_GAME);
  }
}

public void onPause() {
  super.onPause();
  if (manager != null) {
    manager.unregisterListener(listener);
  }
}

class AccelerometerListener implements SensorEventListener {
  public void onSensorChanged(SensorEvent event) {
    ax = event.values[0];
    ay = event.values[1];
    az = event.values[2];
  }
  public void onAccuracyChanged(Sensor sensor, int accuracy) {
  }
}
Using other sensors
Google's developer documentation provides detailed information on how to get data from other motion sensors.
Alternatively, you could also use the Ketai library from Daniel Sauter and Jesus Duran, which wraps all of the handling code and makes it very simple to obtain values from different sensors. Ketai can be installed through the Contribution manager.