Advanced VR
Designing experiences in Virtual Reality through interaction and movement.
Journey through (virtual) space
In this tutorial, we will create a virtual environment where we can see a small planetary system from a fixed vantage point, and then select and follow each of the planets as they revolve around the central star. This needs a number of more advance techniques to allow the user of the VR sketch to pick object in the scene and have the position of the VR camera change dynamically in each frame.
We will go step by step, first creating the objects in the scene, then adding movement to them, and finally implementing object selection and camera positioning.
A simplified solar system
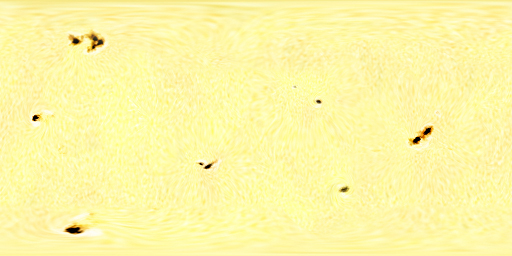
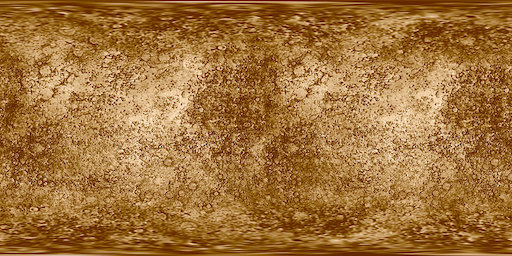
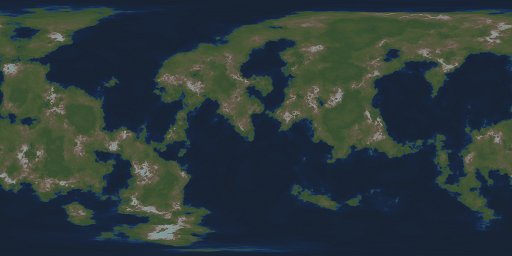
Our solar system will have a central sun and only two orbiting planets. All of these elements are spheres, which we can store in PShape objects to optimize the performance of our sketch by avoiding the spheres being recreated in each frame. Since we want these spheres to look like planets, we cannot simply paint them with a solid fill color. The easiest way to give our planets a realistic appearance is to texture them with images that were generated from actual planet photographs, or with a generartive algorithm that is able to reproduce the shapes of landmasses and other planetary features as seen from space. More specifically, we need images of planet surfaces represented as equirectangular projections so they can be used to wrap our spheres correctly. We will use the following three images for the sun and the two planets:
There are many resources online to get more images like this, for example this one has equirectangular projection images for all the planets in our solar system.
Let's start by adding the sun to our VR scene:
import processing.vr.*;

PShape sol;

void setup() {
  fullScreen(VR);
  cameraUp();

  noStroke();
  sphereDetail(40);

  sol = createShape(SPHERE, 100);
  sol.setTexture(loadImage("sol.jpg"));
}

void draw() {
  background(0);
  shape(sol);
}
In the setup() function we set the VR renderer and with cameraUp() we make sure thast the scene is already centered in the middle of the screen with the Y axis pointing up, which is the standard configuration to work in VR. We also disable strokes and set a sphere detail that's high enough so the individual faces making up the spheres are not recognizable. We set our image as the texture of the PShape with the setTexture() call, which should also be done during setup to avoid slowing down the sketch.
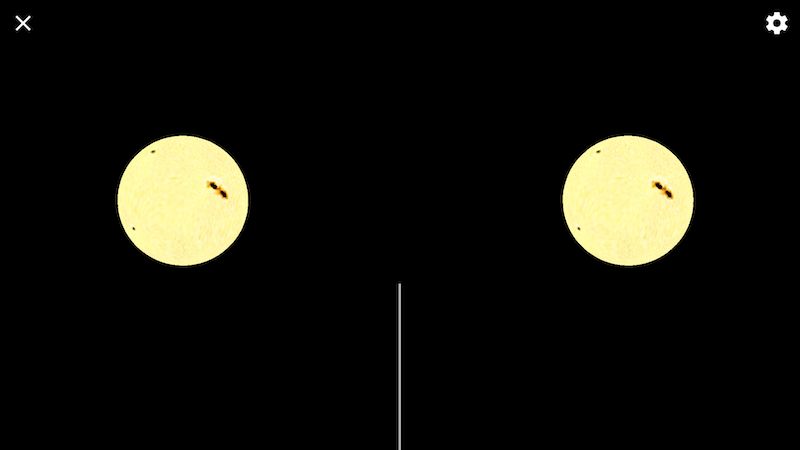
Running this sketch shoud give us the sun centered in our VR scene:
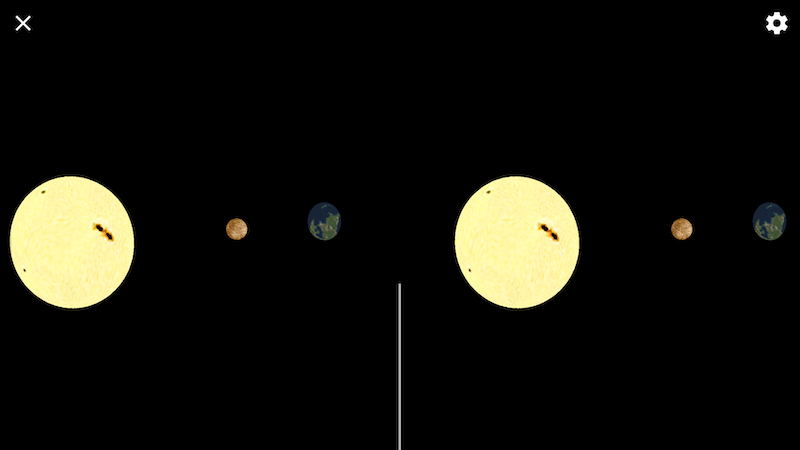
Similarly, we can add the planets to the scene, applying some initial translations to they are not overlapping with the sun:
import processing.vr.*;

PShape sol;
PShape planet1;
PShape planet2;

void setup() {
  fullScreen(VR);
  cameraUp();

  noStroke();
  sphereDetail(40);

  sol = createShape(SPHERE, 100);
  sol.setTexture(loadImage("sol.jpg"));

  planet1 = createShape(SPHERE, 20);
  planet1.setTexture(loadImage("mercury.jpg"));

  planet2 = createShape(SPHERE, 50);
  planet2.setTexture(loadImage("earthlike.jpg"));
}

void draw() {
  background(0);
  shape(sol);

  pushMatrix();
  translate(300, 0, 0);
  shape(planet1);
  popMatrix();

  pushMatrix();
  translate(600, 0, 0);
  shape(planet2);
  popMatrix();
}
This sketch renders a static system with a sun and two planets:
Now, it is time to add movement! The sun can remain immovile in our scene, but the plants should revolve around the sun. We implement the orbital rotations fo the planets by using the rotateY() function and adding a couple of variables to keep track of the rotation angle for each planet and to increase it in each frame:
import processing.vr.*;

PShape sol;
PShape planet1;
PShape planet2;

float orbitalAngle1;
float orbitalAngle2;

void setup() {
  fullScreen(VR);
  cameraUp();

  noStroke();
  sphereDetail(40);

  sol = createShape(SPHERE, 100);
  sol.setTexture(loadImage("sol.jpg"));

  planet1 = createShape(SPHERE, 20);
  planet1.setTexture(loadImage("mercury.jpg"));

  planet2 = createShape(SPHERE, 50);
  planet2.setTexture(loadImage("earthlike.jpg"));
}

void calculate() {
  orbitalAngle1 += 0.002;
  orbitalAngle2 += 0.001;
}

void draw() {
  background(0);
  shape(sol);

  pushMatrix();
  rotateY(orbitalAngle1);
  translate(300, 0, 0);
  shape(planet1);
  popMatrix();

  pushMatrix();
  rotateY(orbitalAngle2);
  translate(600, 0, 0);
  shape(planet2);
  popMatrix();
}
In VR sketches it is very important to note that we have another function in addition to setup() and draw(), which is calculate(). This function should contain all the code that performs non-visual calculations that should happen before drawing a new frame in the scene. In normal Processing sketches, we just put that code directly inside draw(), but this is not a good idea in VR since in that case, draw() gets called twice per frame, once for each eye. The calculate() function, on the other hand, gets called just once before draw(). In this particular case, we simply update the two orbital angles.
In order to increase the realism of our planetary system, we should also incorporate rotation of the planets around their own axes. In order to do that, we need to add two new variables to keep track of the additional angles, and the corresponding rotateY() calls after the translations (so the rotations happen around the spheres' axes and not the origina of coordinates):
...
float rotationAngle1;
float rotationAngle2;
...
void calculate() {
  orbitalAngle1 += 0.002;
  orbitalAngle2 += 0.001;
  rotationAngle1 += 0.02;
  rotationAngle2 += 0.02;
}

void draw() {
  background(0);
  shape(sol);

  pushMatrix();
  rotateY(orbitalAngle1);
  translate(300, 0, 0);
  rotateY(rotationAngle1);
  shape(planet1);
  popMatrix();

  pushMatrix();
  rotateY(orbitalAngle2);
  translate(600, 0, 0);
  rotateY(rotationAngle2);
  shape(planet2);
  popMatrix();
}
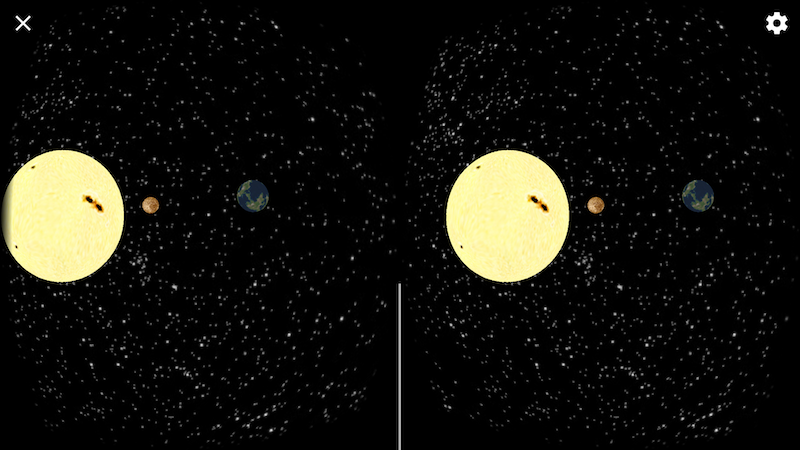
Our mini solar system is almost ready! One aspect that's not very realistic right now is the black background. We need a convincing star field that surrounds our scene. An easy way to implement it could be placing a large-enough sphere containing our sun and planets, and texturing it with a equirectangular projection image of the night sky. For instance, this page contains very detailed resources on astronomical projections, including suitable images to texture a skymap sphere.
PShape stars;
...
void setup() {
  ...
  stars = createShape(SPHERE, 1000);
  stars.setTexture(loadImage("startfield.jpg"));
  ...
}

...

void draw() {
  background(0);
  shape(stars);
  shape(sol);
  ...
}
With this latest addition, we arrive to a nicely looking solar system with planets revolving around the central sun and with the backdrop of a 360 degrees starfield:
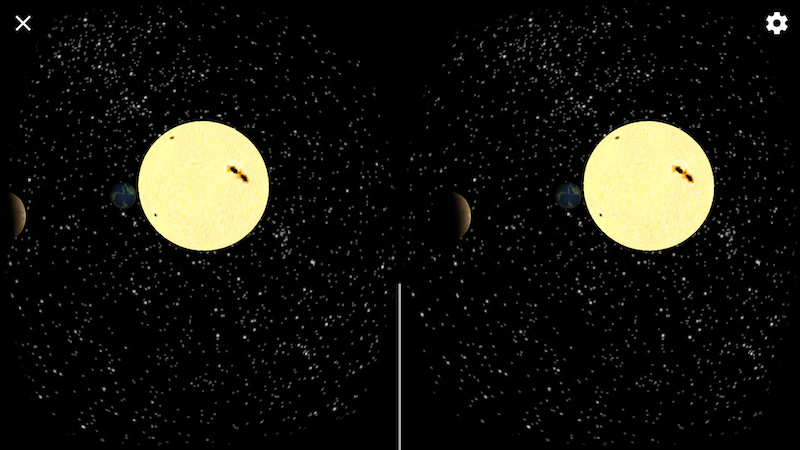
As a final (and important detail) we can enable lights so that planets are correctly shaded dependig on their orientation towards the sun. Let's try incorporating a single point light centered in the origin of coordinates, which is the location of the sun, we only need a single line of code to do that:
  ...
  shape(sol);

  pointLight(255, 255, 255, 0, 0, 0);

  pushMatrix();
  ...
Notice that the pointLight() call is after drawing the sun's shape, so it's not affected by its own light. The results seem to be quite satisfactory:
Selecting objects in VR
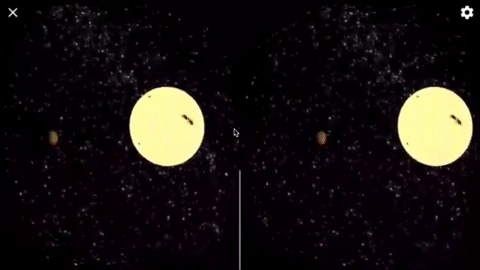
Up to this point, the viewers of our sketch don't have the possibilty of moving in VR. This can be fine in many instances, but here we could make our planetary system much more immersive if the users are able to navigate around and look at the scene from different vantage points. There are many ways to implement motion in VR, one choice is to let users selecting a planet with their gaze, and then transporting to the selected planet when they tap with the VR headset.
So, there are two steps in our interaction. First, the users should get some cue of what planet are they looking at, and second enacting the selection when tapping while the planet is being looked at.
Processing for Android includes a number of functions to perform "ray-casting" selection of objects in VR. In a ray casting algorithm, a line is extended forward from the position of the viewer's eyes, and objects that are intersected by that line would be selected. There are many ray-casting algorithms depending on the type of objects one needs to select, and Processing includes ray-casting selection for boxes and spheres with the interesectsBox() and interesectsSphere() functions. Even though this may appear limited, more complex objects can be enclosed by a bounding box or sphere, and calculating the intersection with those bounding geometries is often good enough in applications that require object selection in VR.
Both interesectsBox() and interesectsSphere() work in the same way: one needs to apply all the transformations to place the box or sphere in the desired location, and then call interesectsBox/Sphere with the size of the object as the argument to get the result of the interesection. The following code shows the use of this technique to highlight the sphere corresponding to the planet 1 if it is being looked at:
  pushMatrix();
  rotateY(orbitalAngle1);
  translate(300, 0, 0);
  rotateY(rotationAngle1);
  if (intersectsSphere(20, 0, 0)) {
    planet1.setTint(color(255, 0, 0));
  } else {
    planet1.setTint(color(255));
  }
  shape(planet1);
  popMatrix();
The call to interesectsSphere() has three arguments, the first is the radius of the sphere to intersect, and the other two are the screen coordinates of the starting point for the ray. The value (0, 0) denotes the center of the screen which corresponds exactly to the eyes, but one can use any other (x, y) value in case the ray starts from a different point on the screen.
Setting the view point in VR
Movement in VR requires the position of the viewer's eye to be set depending on interaction, animation, etc. The VR library in Processing includes a VRCamera class that helps implementing such changes in position. VRCamera's setPosition() function takes a (x, y, z) position in world coordinates, and places the VR view point at exactly that location.
To use a VRCamera, we only need to add the variable to the sketch, and create it in setup():
void setup() {
  fullScreen(VR);
  cameraUp();

  cam = new VRCamera(this);
  cam.setNear(10);
  cam.setFar(1500);
  ...
VRCamera also allows us to set the near and far planes, which determine how close or how far one can view into the virtual space.
In the solar system sketch we discussed before, planets move along their orbints around the sun and also rotate around their own axes. So if we were to place the VR camera at a location fixed with respect to one of the planets, we'd need to calculate the world coordinates of that location. In order to do that, we can construct a transformation matrix that encapsulates all the transformations in the same order they are applied with drawing the planet (rotation around the sun/translation to orbit/rotation around the planet's axis). We can do this as follows:
  PMatrix3D mat = new PMatrix3D();
  float cx, cy, cz;
  mat.rotateY(orbitalAngle1);
  mat.translate(300, 0, 0);
  mat.rotateY(rotationAngle1);
  mat.translate(-2 * 20, 0, 0);

  cx = mat.multX(0, 0, 0);
  cy = mat.multY(0, 0, 0);
  cz = mat.multZ(0, 0, 0);
  ...
  cam.setPosition(cx, cy, cz);
We apply the transformation on the (0, 0, 0) poisition, which is the default placement of the sphere before any subsequent transformations. In this way, the point (cx, cy, cz) contains the final location of planet 1's sphere.
We can combine this transformation code with the earlier sphere ray-casting selection to apply the transformation only when the desired sphere is selected by the viewer. Again, the transformation code that produces (cx, cy, cz) should be placed in calculate() to avoid duplicated evaluation. In the end, the complete sketch would read like follows:
import processing.vr.*;

VRCamera cam;

PShape stars;
PShape sol;
PShape planet1;
PShape planet2;

float orbitalAngle1;
float orbitalAngle2;
float rotationAngle1;
float rotationAngle2;

int followPlanet;
PMatrix3D mat = new PMatrix3D();
float cx, cy, cz;

void setup() {
  fullScreen(VR);
  cameraUp();

  cam = new VRCamera(this);
  cam.setNear(10);
  cam.setFar(1500);

  noStroke();
  sphereDetail(40);

  stars = createShape(SPHERE, 1000);
  stars.setTexture(loadImage("startfield.jpg"));

  sol = createShape(SPHERE, 100);
  sol.setTexture(loadImage("sol.jpg"));

  planet1 = createShape(SPHERE, 20);
  planet1.setTexture(loadImage("mercury.jpg"));

  planet2 = createShape(SPHERE, 50);
  planet2.setTexture(loadImage("earthlike.jpg"));
}

void calculate() {
  orbitalAngle1 += 0.002;
  orbitalAngle2 += 0.001;
  rotationAngle1 += 0.02;
  rotationAngle2 += 0.02;

  if (0 < followPlanet) {
    float d;
    float r;
    float oa;
    float ra;
    if (followPlanet == 1) {
      d = 300;
      r = 20;
      oa = orbitalAngle1;
      ra = rotationAngle1;
    } else {
      d = 600;
      r = 50;
      oa = orbitalAngle2;
      ra = rotationAngle2;
    }

    mat.reset();
    mat.rotateY(oa);
    mat.translate(d, 0, 0);
    mat.rotateY(ra);
    mat.translate(-2 * r, 0, 0);

    cx = mat.multX(0, 0, 0);
    cy = mat.multY(0, 0, 0);
    cz = mat.multZ(0, 0, 0);
  }
}

void draw() {
  background(0);
  shape(stars);

  if (0 < followPlanet) cam.setPosition(cx, cy, cz);

  shape(sol);
  if (intersectsSphere(100, 0, 0) && mousePressed) followPlanet = 0;

  pointLight(255, 255, 255, 0, 0, 0);

  pushMatrix();
  rotateY(orbitalAngle1);
  translate(300, 0, 0);
  rotateY(rotationAngle1);
  if (followPlanet != 1 && intersectsSphere(2 * 20, 0, 0)) {
    planet1.setTint(color(255, 0, 0));
    if (mousePressed) followPlanet = 1;
  } else {
    planet1.setTint(color(255));
  }
  shape(planet1);
  popMatrix();

  pushMatrix();
  rotateY(orbitalAngle2);
  translate(600, 0, 0);
  rotateY(rotationAngle2);
  if (followPlanet != 2 && intersectsSphere(2 * 50, 0, 0)) {
    planet2.setTint(color(255, 0, 0));
    if (mousePressed) followPlanet = 2;
  } else {
    planet2.setTint(color(255));
  }
  shape(planet2);
  popMatrix();
}
The logic in the draw() function works like this: if the planet is not selected already, Processing will find if the ray from the eye intersects the sphere, and if so, tints it red and makes VRCamera to follow the planet by setting its position to (cx, cy, cz). If the user selects the sun, the camera's position returns to the intital fixed placement.
The complete sketch code is available here.